Rewrite: How to create a Page builder with Rails
This is a rewrite of the How to create a Page builder with Rails that I wrote last month. I left the old one for history, but I wanted to make the builder look nicer and refactor the code. If you did not see the other one don’t worry I will take this from the beginning.
I said in the other article my implementation will not be full featured, but it can be a starting point. Also, I am sure there are better ways to go about this.
I have been wanting to create this for a while, but did not know how to accomplish it, and so as all good developers do I “googled” 😃 I was not able to find much, but was able to piece together the idea. Here is what I came up with.
The completed project is here.
Let’s start
I am assuming that you are familiar with Rails and have your workstation all setup to create a Rails app.
In the terminal enter:
mkdir pagebuilderapp
cd pagebuilderapp
rails new . --database=postgresql
What we did here is create a new directory called “pagebuilderapp” and then changed into the new directory. Next we created a new Rails app, but we will be using Postgres as our database instead of sqlite later. The reason is that we will be using JSON to store information.
Test that the app was created successfully. In the terminal run:
rails db:create
Since we are using Postgres we need to create the database first, or else you will get an error.
Next start the rails app.
rails s
Open the browser and navigate to http://localhost:3000/ and you should see the Yay! page.

Create resources
First we will scaffold Pages, run the following command:
rails generate scaffold page name:string
Page is where all the page elements (i.e. Hero and Text sections) will be added to.
Next we will scaffold Elements, run the following command:
rails generate scaffold element name:string element_type:string
Element is mainly used to reference the partials (blueprint) that the page element will use. While I didn’t do it, you could use the Element to store default properties and their values. This is something I may implement later if I use this in a “real world” case.
Next we will scaffold PageElements, run the following command:
rails generate scaffold page_element page:belongs_to element:belongs_to properties:jsonb
PageElement will store the properties of the element that will show up on the Page. This is the last resource, but before run the db:migrate we need to make change to the PageElement migration file. Open the db/migrate/*
class CreatePageElements < ActiveRecord::Migration[6.1]
  def change
    create_table :page_elements do |t|
      ...
      t.jsonb :properties, null: false, default: '{}'
      ...
    end
  end
end
Add , null: false, default: '{}' to the t.jsonb line. This will make sure it has a value.
Lastly, we will scaffold ElementProperties, run the following command:
rails generate scaffold element_property element:belongs_to name:string input_type:string value:string The ElementProperties will be used to store default values and properties for the Elements. So when we click to add a Hero to the page it will create the form based on the ElementProperties. This will be made clear as we build out the app.
We are done with the migration, and now create the tables by running:
rails db:migrate
We need to update the Page and Element models to complete the relationship of the PageElements and ElementProperties. Open models/page.rb and adding the following:
has_many :page_elements, dependent: :destroy
Open models/element.rb and adding the following:
has_many :element_properties, inverse_of: :element
has_many :page_elements, dependent: :nullify

accepts_nested_attributes_for :element_properties, allow_destroy: true, reject_if: :all_blank
As you will see above I add a line accepts_nested_attributes_for for the ElementProperties. That is because an Element can have more than one property. When we are creating the Element we can add as many properties as we like. If you are asking why we did not use a JSONB to store this information? That is because we ‘know’ what input we will store. Where as PageElements properties can vary on the Element.
Now we need to update the PageElement model. Serialize will helps to work with the Page Elements properties which will be of data type JSON.
...
 serialize :properties
Static Page
Before going any further we will set up a home page and navigations. This is optional, but it helps when we are trying to move around the app in the browser. This time run:
rails generate controller StaticPages home
This will create the controller, view, and add the route for static pages and a home action.
We need to update the routes file to add a root path. In the config/routes.rb make the following change.
get 'static_pages/home' # <- Delete this line
root 'static_pages#home' # <- Add this link
Now if you start the rails app it will go to the default created home.html.erb page.
So it will look good lets add Bulma, which is a nice CSS framework. You can learn more by going to bulma.io. Open the views/layouts/application.html.erb and inside the head tags add the following.
<head>
...
  <link rel="stylesheet" href="https://cdn.jsdelivr.net/npm/bulma@0.9.3/css/bulma.min.css">
</head>
Since you are already in the application.html.erb page add the navigation partial above the yield.
<body>
  <%= render 'shared/navigation' %> # <- Add this line
  <%= yield %>
</body>
Next will create the navigation partial. Under the views add a folder called shared and then create a partial call _navigation.html.erb.
Open the views/shared/_navigation.html.erb file and add the following:
<nav class="navbar is-primary" role="navigation" aria-label="main navigation">
  <div class="container navbar-menu">
    <div class="navbar-start">
      <%= link_to 'Home', root_path, class: 'navbar-item' %>
      <%= link_to 'Pages', pages_path, class: 'navbar-item' %>
      <%= link_to 'Elements', elements_path, class: 'navbar-item' %>
    </div>
  </div>
</nav>
Now the navigation is on every page.
Elements
To create an Element we need to address a few items to get the ElementProperties nested attributes. We need to update the form so that we can add the propertiesusing the nested form approach. I pretty much just followed this post by Steve Polito Create a nested form in rails from scratch on getting this part set up. He has some great post so I would recommend checking them out.
Update the ElementsController permitted parameters to include the element_properties_attributes.
...
def element_params
  params.require(:element).permit(:name, :element_type, element_properties_attributes: [:id, :name, :input_type, :value, :_destroy])
end
Create an partial for the element_properties views\elements\_element_property_fiels.html.erb
<div class="nested-fields">
  <%= f.hidden_field :_destroy %>
  <div class="field">
    <%= f.label :name, class: 'label' %>
    <div class="control">
        <%= f.text_field :name, class: 'input' %>
    </div>
  </div>

  <div class="field">
    <%= f.label :input_type, class: 'label' %>
    <div class="control">
      <%= f.text_field :input_type, class: 'input' %>
    </div>
  </div>

  <div class="field">
    <%= f.label :value, class: 'label' %>
    <div class="control">
      <%= f.text_field :value, class: 'input' %>
    </div>
  </div>

  <div class="field">
    <div class="control">
      <%= link_to "Remove", '#', class: "remove_fields" %>
    </div>
  </div>
</div>
Update the Elements form partial views\elements\_form.html.erb to include the new element_property_fields partial.
<fieldset>
  <h4 class="title is-4">Properties:</h4>
  <%= form.fields_for :element_properties  do |property| %>
    <%= render "element_property_fields", f: property %>
  <% end %>
  <%= link_to_add_fields "Add Property", form, :element_properties %>
</fieldset>

<hr />
In the article Steve wrote he create a Helper and two JavaScript files, and I just created the same files and copy and pasted the code. Please see steps 4 and 5 of that article. I just want to see that he gets credit for this work.
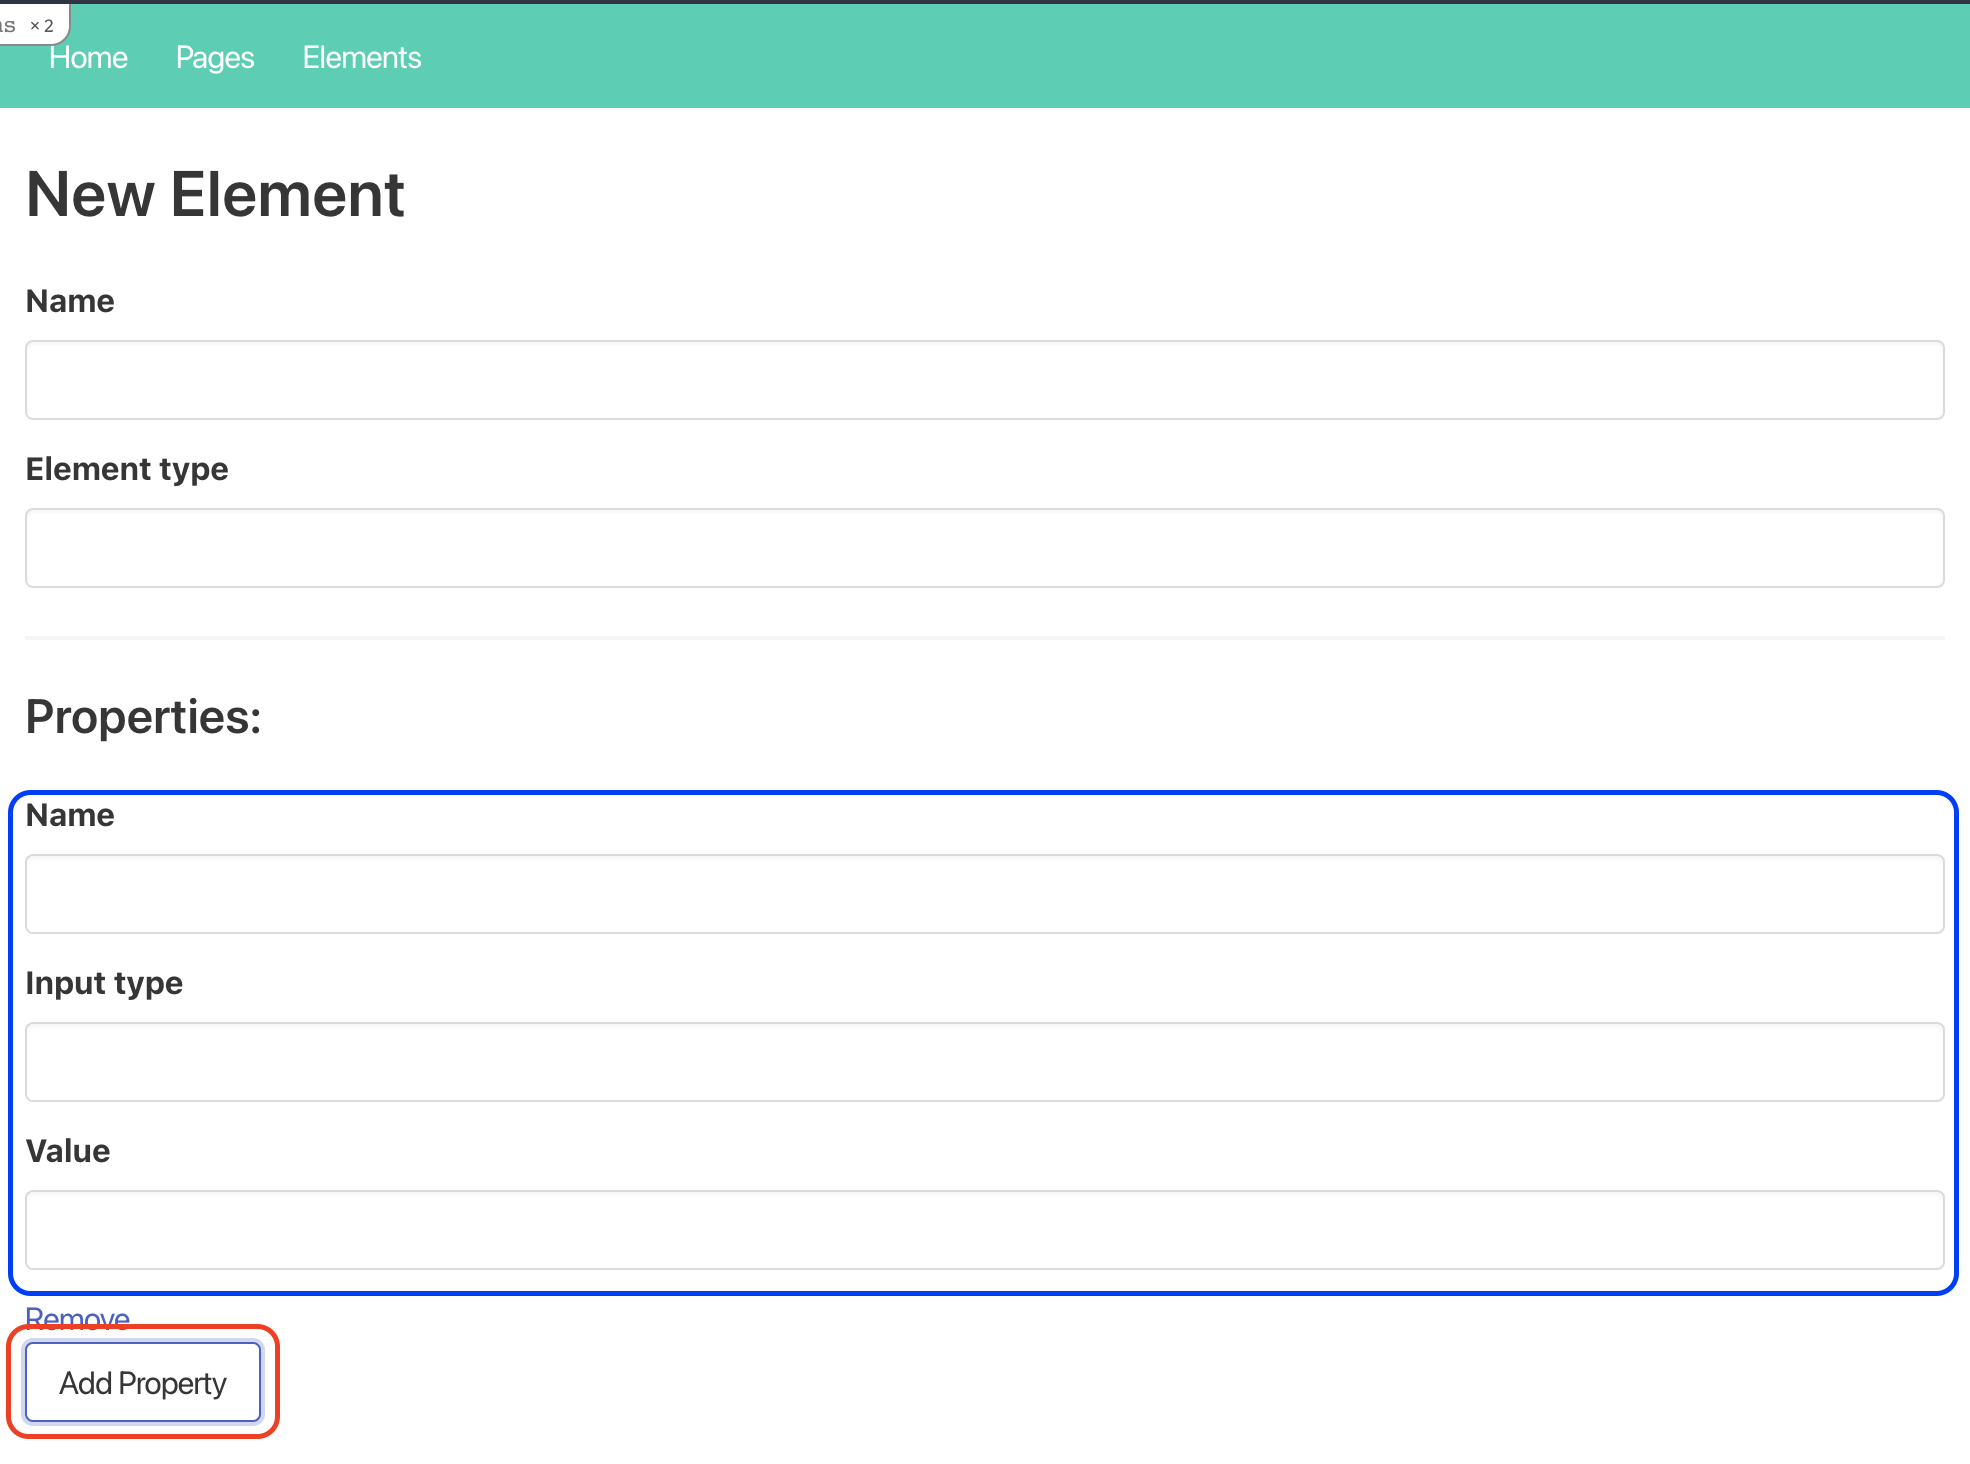
With that in place if you go to create a new Element a form should look like this. If you click the ‘Add Property’ the a nested form will appear under the Propteries heading. Now if you need to add another property all you have to do is click the Add Property button.
Now we can start creating our elements. Let us create a Hero. Below are the values you will enter. For Properties for each row you will need to click Add Property.
Name: Hero
Element Type: hero
Properties:
| Name | Input Type | Value |
|---|---|---|
| hero_h1 | text | Hero Title |
| hero_subtitle | text | Hero subtitle |
| background_color | color | #ffffff |
| text_color | color | #000000 |
| padding_top | text | 0 |
| padding_bottom | text | 0 |
| padding_left | text | 0 |
| padding_right | text | 0 |
| cta_url | text |
We will create a second element and this time we will create a Text element.
Name: Text
Element Type: text
Properties:
| Name | Input Type | Value |
|---|---|---|
| text_color | color | #000000 |
| text_align | text | left |
| text_value | text | Text goes here… |
| padding_top | text | 0 |
| padding_bottom | text | 0 |
| padding_left | text | 0 |
| padding_right | text | 0 |
Pages
Create a new page that we use for the rest of this article.

This will take you to the newly create page.
PageElements
Now that we have that in place it is time to start adding elements to our page. So the idea is to have a list of Elements that will show up on the Pages edit page. What you will see in some page builder is a fly out blade or a column with buttons or tiles that you can drag and drop onto the page. Ours will not be that sophisticated. We will just list the Element as buttons in a side column and then when you will click on the button it will append the element to the page.
To start out lets make a change to the routes.rb page. I want the PageElements to be a nested resource of Page. Open config/routes.rb and move resources :page_elements inside a resources :pages block.
Rails.application.routes.draw do
  ...
  resources :pages do
    resources :page_elements
  end
  ...
end
Next we need to be able to list the available Elements on the Pages edit page file. Open the controllers/pages_controller.rb and update the edit to get all available Elements.
  def edit
    @elements = Element.all
  end
Next we will open the views/pages/edit.html.erb. Below the edit form add the following:
<div class="columns">
  <div class="column is-three-quarters">

    <h2 class="title is-2">Editing Page</h2>

    <div class="columns is-half">
      <%= render 'form', page: @page %>
    </div>

    <%= link_to 'Show', @page %> |
    <%= link_to 'Back', pages_path %>
    <hr />
    <div id="page-element-content">
      <% @page.page_elements.each do |el| %>
        <%= render "page_elements/elements/#{el.element.element_type}_edit", page_element: el %>
      <% end %>
    </div>
  </div>

  <div class="column">
    <h3 class="title is-4 mb-2">Elements</h3>

    <% @elements.each do |el| %>
        <%= link_to el.name, new_page_page_element_path(@page, element_type: el.element_type), remote: true, role: "button", class: "button is-fullwidth is-info mb-2" %>
    <% end %>
    <hr />
    <div id="element-properties-form"></div>
  </div>
</div>
There is alot being added so I will try to go through it. We are creating a two column layout with the list of Elements buttons to the right and the rest of the page will show the represnetations of the Elements. The list of Elments are buttons and they have an attribute of remote: true which will make a Ajax request to the controller which will repond with a JavaScript file and no page refresh. The JavaScript file will render two partials. One for the properties form and the other for element partial. If you try to click the Edit link for the newly created Page you will get an error because we need to make some changes to the PageElements controller.
Open controllers/page_elements_controller.rb. Update the new action and add some before_actions by adding the following lines:
class PageElementsController < ApplicationController
  before_action :set_page
  before_action :set_element, only: %i[ new create edit update ]
  ...
Update the new method for the @page_element. Add the set_default_value to call this method
  def new
    @page_element = @page.page_elements.new
    set_default_value
  end
Update the create method to add @element ID. Update the redirect_to for the create, update, destroy methods. This is so the on redirect it will go to the edit page Page.
  def create
    @page_element = @page.page_elements.new(page_element_params)
    @page_element.element_id = @element.id

    respond_to do |format|
      if @page_element.save
        format.html { redirect_to edit_page_path(@page), notice: "Page element was successfully created." }
        format.json { render :show, status: :created, location: @page_element }
      else
        format.html { redirect_to edit_page_path(@page), status: :unprocessable_entity }
        format.json { render json: @page_element.errors, status: :unprocessable_entity }
      end
    end
  end
We are adding set_page, set_element, set_properties, and set_default_values. We are updating the page_element_params to use set_properites for the properties attributes. The jsonb properties works similar to nested attributes where you will need list the permitted param. Since the properties will vary from element to element this gives us a way to dynamically add the permitted nested parameters. The set_dafault_values is used in the new method, and as the name suggest it will just set the default value for the properties.
  ...
  private
    # Use callbacks to share common setup or constraints between actions.
    def set_page
      @page = Page.find(params[:page_id])
    end

    def set_element
      @element = Element.find_by(element_type: params[:element_type])
    end
  ...
      # Only allow a list of trusted parameters through.
    def page_element_params
      # params.require(:page_element).permit(:element_id, properties: {})
      params.require(:page_element).permit(:element_id, properties: set_properties)
    end

    def set_properties
      @element.element_properties.map do |property|
        property[:name].to_sym
      end
    end

    def set_default_values
      @page_element.properties = {}
      @element.element_properties.each do |property|
        @page_element.properties[property[:name]] = property[:value]
      end
    end
Now that is in place we can work on having a “Hero” form appear on the page. First add a folder under the views/page_elements/ called elements. This will hold the partials for the elements. Under the new elements folder create a partial called _hero_form.html.erb, and add the following:
<%= form_with(model: [page, page_element]) do |form| %>
  <% if page_element.errors.any? %>
    <div id="error_explanation">
      <h2><%= pluralize(page_element.errors.count, "error") %> prohibited this page_element from being saved:</h2>

      <ul>
        <% page_element.errors.each do |error| %>
          <li><%= error.full_message %></li>
        <% end %>
      </ul>
    </div>
  <% end %>
  <%= hidden_field_tag :element_type, @element.element_type %>

  <%= form.fields_for :properties, OpenStruct.new(form.object.properties) do |property| %>
    <% @element.element_properties.each do |ep| %>
      <div class="field">
        <%= label_tag ep.name, nil, class: 'label' %>
        <div class="control">
        <% if ep.input_type == "color" %>
          <%= property.color_field ep.name, class: 'input' %>
        <% else %>
          <%= property.text_field ep.name, class: 'input' %>
        <% end %>
        </div>
      </div>
    <% end %>
  <% end %>

  <div class="field">
    <div class="control">
      <%= form.submit 'Save', class: 'button is-link' %>
    </div>
  </div>
<% end %>
Since we are nesting the page_element the first line will make it have the correct action path the form_with(model: [page, page_element]) will create the path /pages/:id/page_elements. There is a hidden field for the element_type which is used to set the element in the controller. Next is the fields_for which will allow us to take the properties loop and through then and create the input fields.What is the deal with the OpenStruct. Since the properties key/value structure to be converted into a data structure the form can use to fill the value for each input. Below I am just showing the pieces broken down.
> form.object
# Returns a PageElement object
=> Form: #<PageElement:0x0000...>

> form.object.properties
# Returns the properties in a key/value format
=> Form: {"hero_h1"=>"Hero Title", "hero_subtitle"=>"Hero subtitle", "background_color"=>"#ffffff", "text_color"=>"#000000", "padding_top"=>"0", "padding_bottom"=>"0", "padding_left"=>"0", "padding_right"=>"0", "cta_url"=>""}

> OpenStruct.new(form.object.properties)
# Returns a data structure that the form can use.
=> Form: #<OpenStruct hero_h1="Hero Title", hero_subtitle="Hero subtitle", background_color="#ffffff", text_color="#000000", padding_top="0", padding_bottom="0", padding_left="0", padding_right="0", cta_url="">
Inside the fields_for I am looping through the element_propeties so that I can set the fields name and set the correct input type.
Next create a new.js.erb file under views/page_elements/. Since we are making an Ajax request when we click the “Hero” link the controller receive the request as JS and respond with a .js.erb file. Open the views/page_elements/new.js.erb file and add the following:
document.querySelector("#page-element-content").insertAdjacentHTML("beforeend", "<%= j render "page_elements/elements/#{@element.element_type}_edit", page_element: @page_element %>")

document.querySelector("#element-properties-form").innerHTML = ("<%= j render "page_elements/elements/#{@element.element_type}_form", page: @page, page_element: @page_element %>")
We are using JavaScript to locate targets in the Page edit.html.erb page to insert/append partials. The first being the representation of the Element and the send is for the Page Elements form so we can edit the properties. We already added these targets when updated the Page edit form.
Next create a partial _hero_edit.html file under views/page_elements/elements/. Open the partial and add the following:
<div class="block my-2 is-relative">
  <div id=<%= "hero-#{dom_id(page_element)}" %> style="<%= hero_styles(page_element.properties) %>">
    <hgroup>
      <h1 class="is-size-1"><%= page_element.properties["hero_h1"].present? ? page_element.properties["hero_h1"] : "Hero Title" %></h1>
      <h3 class="is-size-3"><%= page_element.properties["hero_subtitle"].present? ? page_element.properties["hero_subtitle"] : "Hero Subtitle" %></h3>
    </hgroup>
    <% if page_element.properties["cta_url"].present? %>
      <div style="text-align: center;">
        <a href="#" class="button is-outlined">Go to</a>
      </div>
    <% end %>
  </div>
  <% if page_element.persisted? %>
    <div class="action-buttons has-background-grey-light p-1">
      <%= link_to 'Edit', edit_page_page_element_path(page_element.page, page_element, element_type: 'hero'), remote: true, class: 'button is-light is-small' %>
      <%= link_to 'Delete', page_page_element_path(page_element.page, page_element), method: :delete, data: { confirm: "Are you sure?" }, class: 'button is-light is-small' %>
    </div>
  <% end %>
</div>
The above partial will be the element that will show on the edit Page. We will create a different partial that will be used on the Page show page. One thing to note is on the first line you will see style="<%= hero_styles(page_element.properties) %>". I had to create helper method called “hero_styles” to take in the properties and map them to the proper CSS names and add the values. This helper returns a string of the styles and values. Example: "background-color:#9effc3;color:#000000;padding-top:px;padding-bottom:px;padding-left:px;padding-right:px;" When you create a page element it will show up with the styles you have submitted. Also the action buttons (Edit, Delete) will not appear until the page elment has been save or persisted.
We will need to create this helper method. Under the app/helpers folder create hero_helper.rb file, and add the following.
module HeroHelper
  def hero_styles(properties)
    styles = ""
    styles << "background-color:" << properties["background_color"].to_s << ";"
    styles << "color:" << properties["text_color"].to_s << ";"
    styles << "padding-top:" << properties["padding_top"].to_s << "px;"
    styles << "padding-bottom:" << properties["padding_bottom"].to_s << "px;"
    styles << "padding-left:" << properties["padding_left"].to_s << "px;"
    styles << "padding-right:" << properties["padding_right"].to_s << "px;"
    styles
  end
end
You will need to create such method for any available Elements that you create or find a way to DRY this up. For now we can just create a separate helper for each Element.
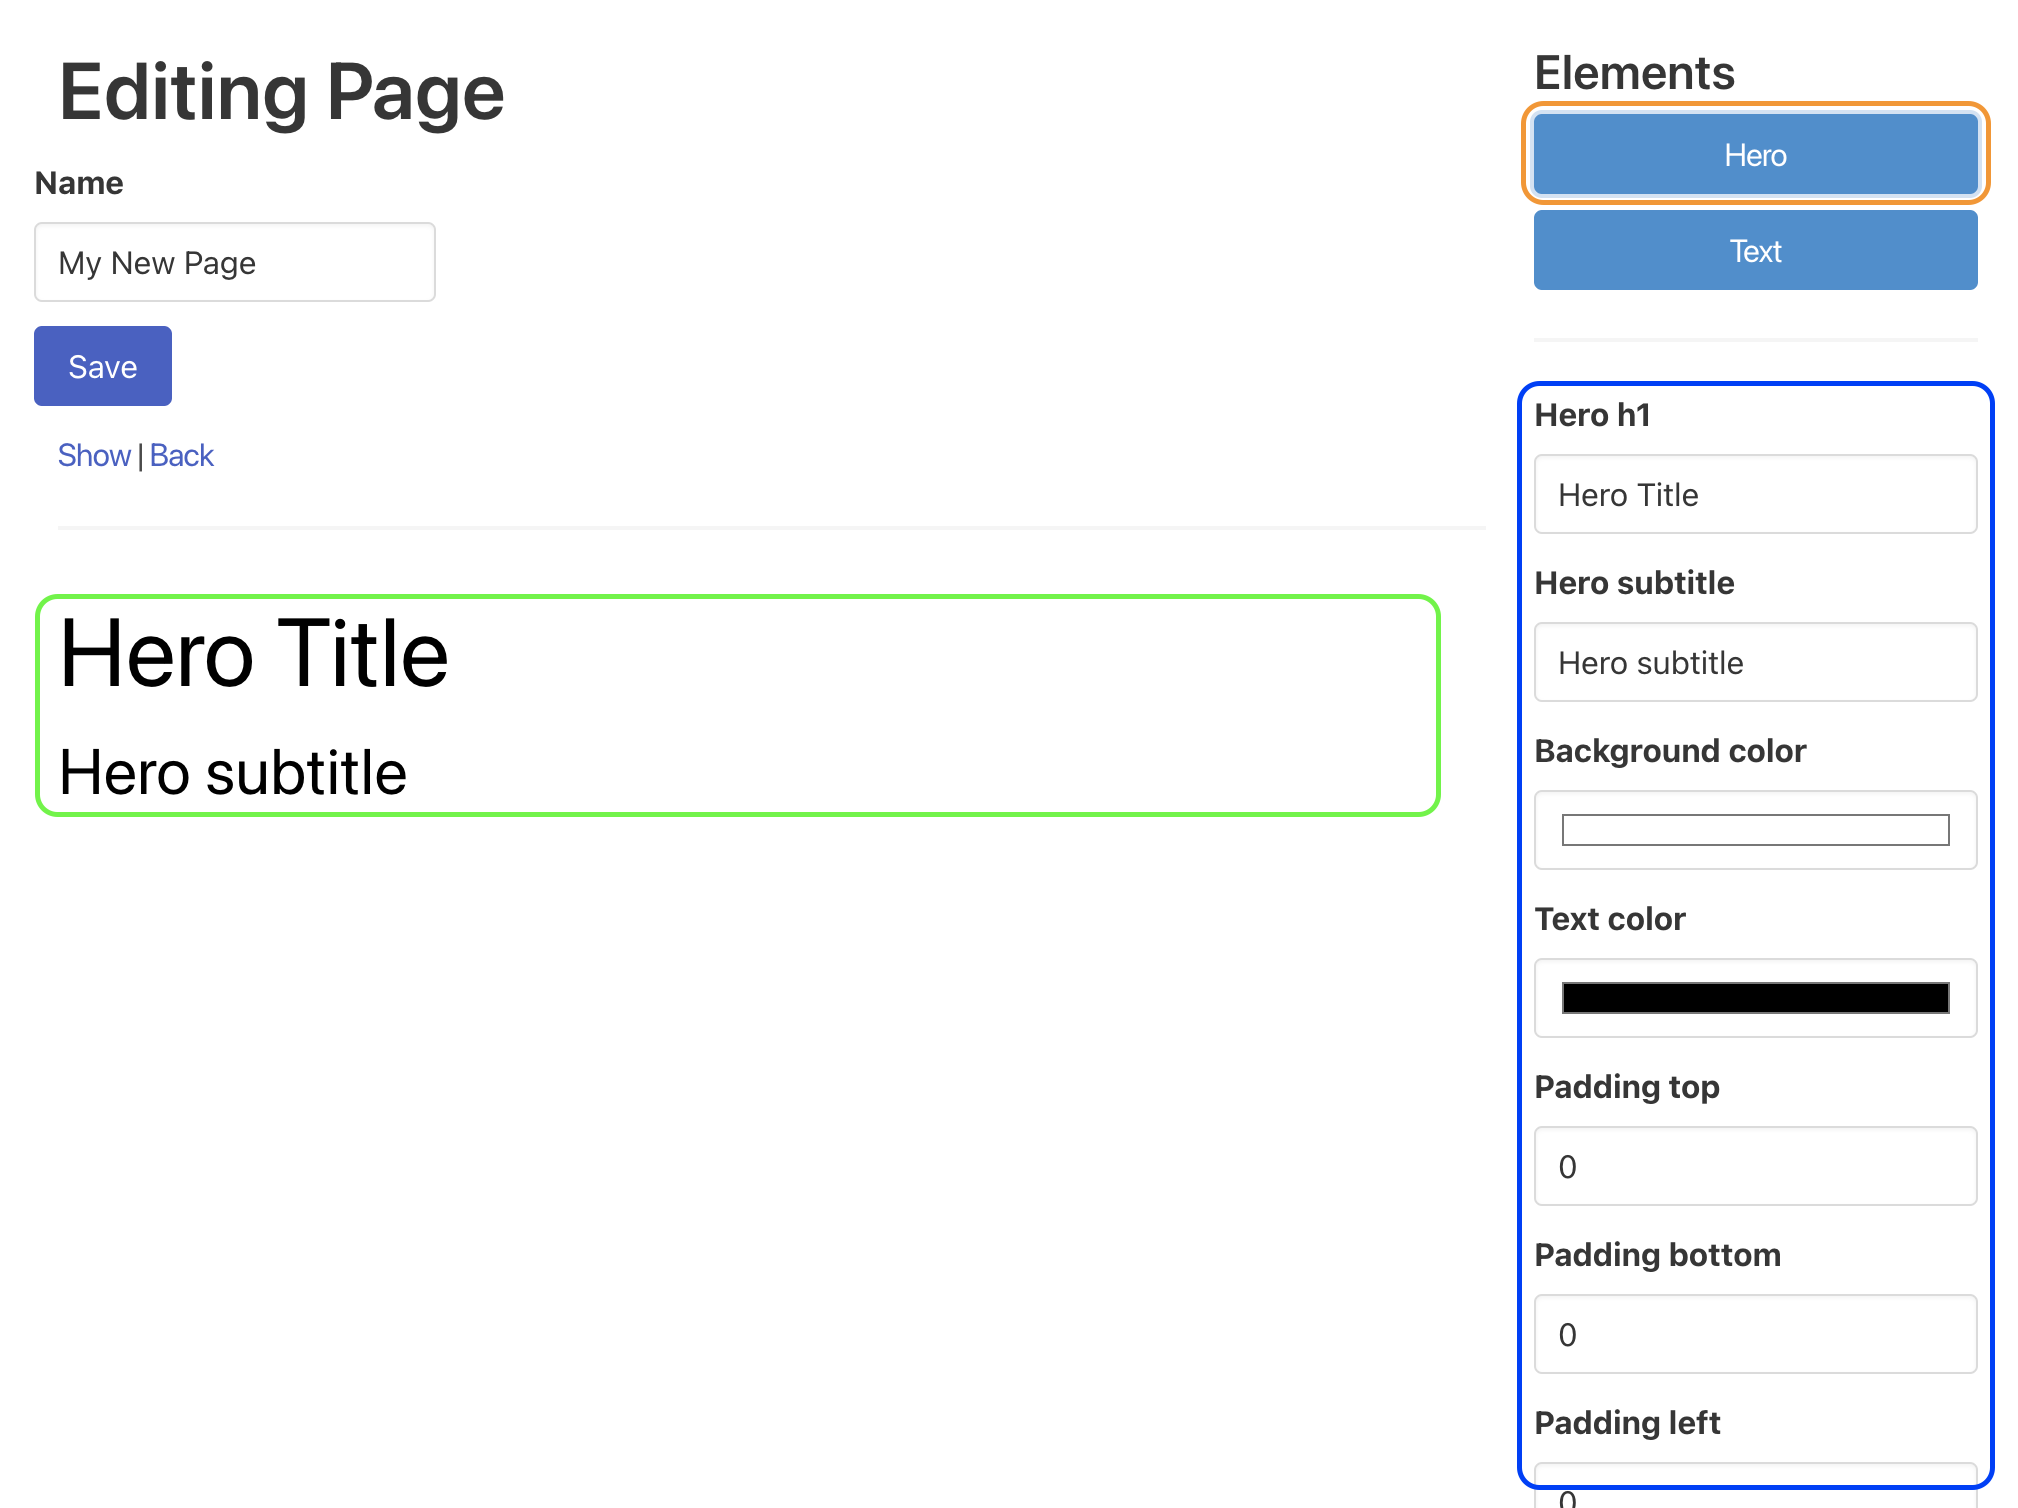
Now if you go to the Page you created and then click edit you will see the Hero button to the right. When you click the “Hero” button the hero form with the hero element will appear with the default values and styles. To edit the page_element change the values in the form below the Hero button and then click the save button below the page_element form.
We will want to show the elements on the Page show page. Open the views/pages/show.html.erb. Add the follwing to the page name.
<h1 class="title is-2">
  <%= @page.name %>
</h1>
<hr />
<div id="page-element-content">
  <% @page.page_elements.each do |el| %>
    <%= render "page_elements/elements/#{el.element.element_type}", page_element: el %>
  <% end %>

<hr />
We are rendering a partial for each page element created. We will need to create this partial. Open views/page_elements/elements/ and add a _hero.html.erb file. Open the _hero.html.erb file and add the following:
<div id=<%= "hero-#{dom_id(page_element)}" %> style="<%= hero_styles(page_element.properties) %>">
  <hgroup>
    <h1 class="is-size-1"><%= page_element.properties["hero_h1"].present? ? page_element.properties["hero_h1"] : "Hero Title" %></h1>
    <h3 class="is-size-3"><%= page_element.properties["hero_subtitle"].present? ? page_element.properties["hero_subtitle"] : "Hero Subtitle" %></h3>
  </hgroup>
  <% if page_element.properties["cta_url"].present? %>
    <div style="text-align: center;">
      <a href="<%= page_element.properties["cta_url"] %>" class="button is-outlined">Go to</a>
    </div>
  <% end %>
</div>
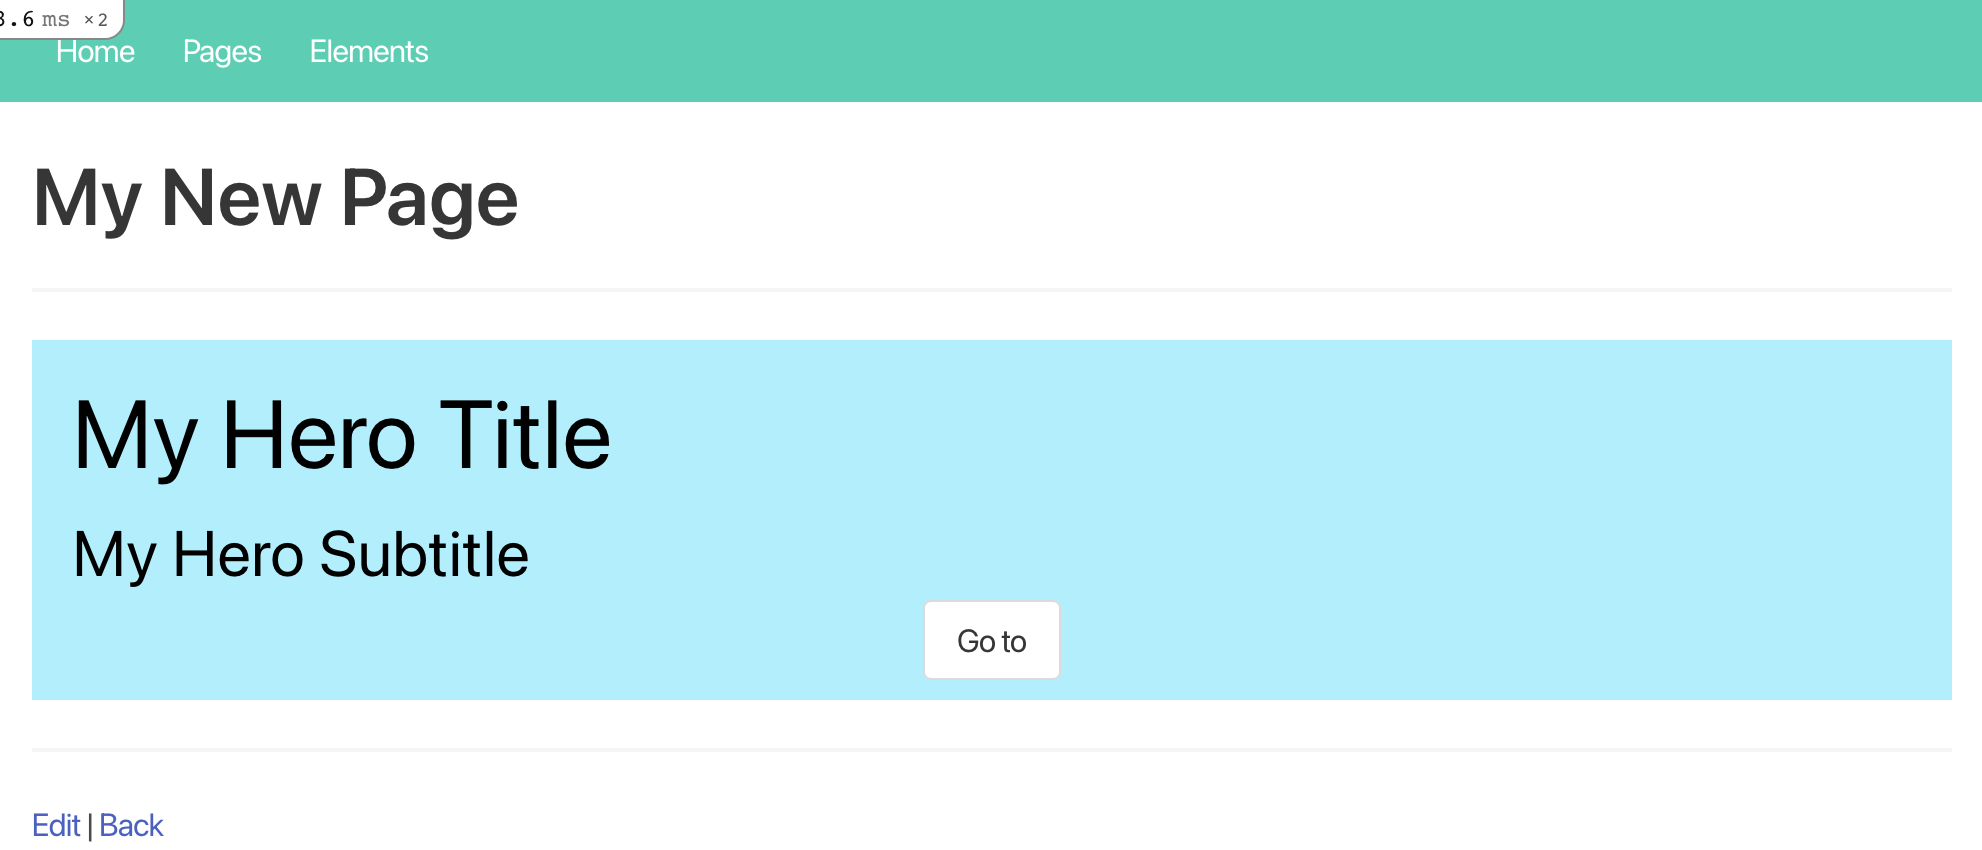
Now if you create a new Page element and go the show page of the Page then you will see the styled element.
To close the circle you can update the Page element by going the edit page of the Page and then click the edit button at the top right of the page element. This will open the edit form.
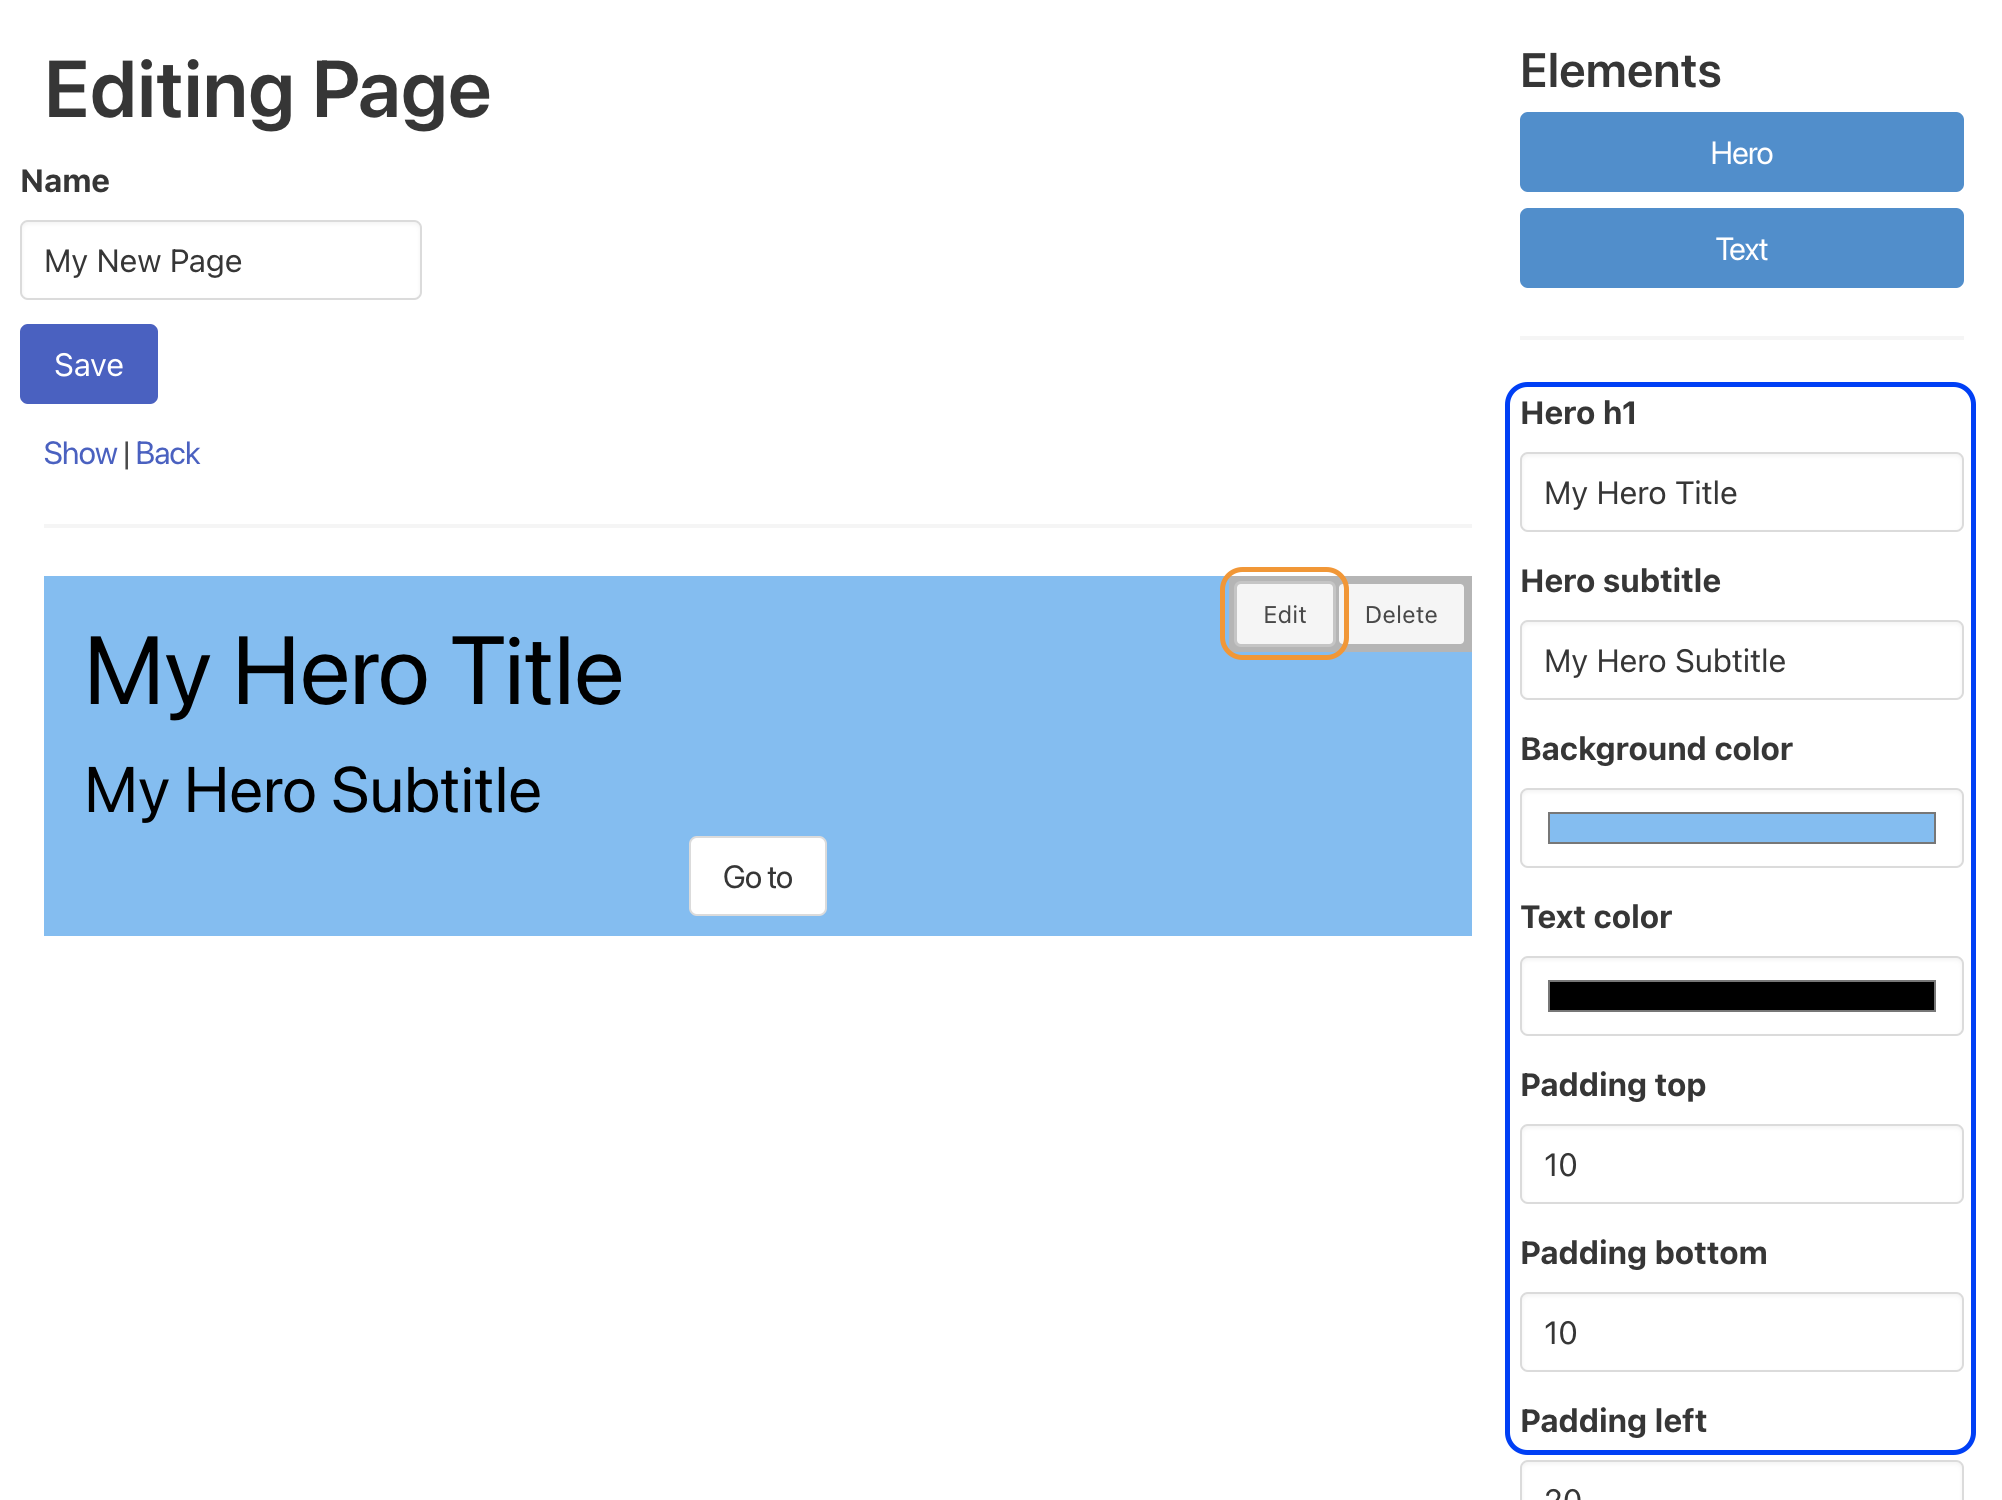
To get this the page elements edit form to appear we need to add a edit.js.erb to the /views/page_elements/. Add the following to the file:
document.querySelector("#element-properties-form").innerHTML = ("<%= j render "page_elements/elements/#{@element.element_type}_form", page: @page, page_element: @page_element %>")
This is similar to the new.js.erb as it will target the id element-properties-form and insert the form.
For the Text Element you will basically create the three partials, _text_edit.html.erb, _text_form.html.erb, _text.html.erb, and the text_helper.rb file.
views/page_elements/elements/_text_edit.html.erb
<div class="block my-2 is-relative">
  <div id=<%= "text-#{dom_id(page_element)}" %> style="<%= text_styles(page_element.properties) %>">
    <p><%= page_element.properties["text_value"].present? ? page_element.properties["text_value"] : "Text goes here" %></p>
  </div>
  <% if page_element.persisted? %>
    <div class="action-buttons has-background-grey-light p-1">
      <%= link_to 'Edit', edit_page_page_element_path(page_element.page, page_element, element_type: 'text'), remote: true, class: 'button is-light is-small' %>
      <%= link_to 'Delete', page_page_element_path(page_element.page, page_element), method: :delete, data: { confirm: "Are you sure?" }, class: 'button is-light is-small' %>
    </div>
  <% end %>
</div>
views/page_elements/elements/_text_form.html.erb
<%= form_with(model: [page, page_element]) do |form| %>
  <% if page_element.errors.any? %>
    <div id="error_explanation">
      <h2><%= pluralize(page_element.errors.count, "error") %> prohibited this page_element from being saved:</h2>

      <ul>
        <% page_element.errors.each do |error| %>
          <li><%= error.full_message %></li>
        <% end %>
      </ul>
    </div>
  <% end %>
  <%= hidden_field_tag :element_type, @element.element_type %>

  <%= form.fields_for :properties, OpenStruct.new(form.object.properties) do |property| %>
    <% @element.element_properties.each do |ep| %>
      <div class="field">
        <%= label_tag ep.name, nil, class: 'label' %>
        <div class="control">
        <% if ep.input_type == "color" %>
          <%= property.color_field ep.name, class: 'input' %>
        <% elsif ep.input_type == "text_area" %>
          <%= property.text_area ep.name, class: 'input' %>
        <% else %>
          <%= property.text_field ep.name, class: 'input' %>
        <% end %>
        </div>
      </div>
    <% end %>
  <% end %>

  <div class="field">
    <div class="control">
      <%= form.submit 'Save', class: 'button is-link' %>
    </div>
  </div>
<% end %>
views/page_elements/elements/_text.html.erb
<div id=<%= "text-#{dom_id(page_element)}" %> style="<%= text_styles(page_element.properties) %>">
  <p><%= page_element.properties["text_value"].present? ? page_element.properties["text_value"] : "Text goes here" %></p>
</div>
helpers/text_helper.rb
module TextHelper
  def text_styles(properties)
    styles = ""
    styles << "color:" << properties["text_color"].to_s << ";"
    styles << "text-align:" << properties["text_align"].to_s << ";"
    styles << "padding-top:" << properties["padding_top"].to_s << "px;"
    styles << "padding-bottom:" << properties["padding_bottom"].to_s << "px;"
    styles << "padding-left:" << properties["padding_left"].to_s << "px;"
    styles << "padding-right:" << properties["padding_right"].to_s << "px;"
    styles
  end
end
Conclusion
This was a fun project. There is a ton of room for improvement. My way of working is I try to make it work and then I make it “pretty”. So I got it to work, and next step is to interate on it to make it better. I hope you enjoyed it and find something useful.